Schedules
Marketing Toolkit
Schedules
If you have scheduled bus service, then creating schedules that are clear, simple, and easy to read is one of the most important things you can do to get new riders onboard. As with route maps, if potential users can’t quickly figure out how to read your schedules, they may look for other transportation alternatives.
Types of Schedules
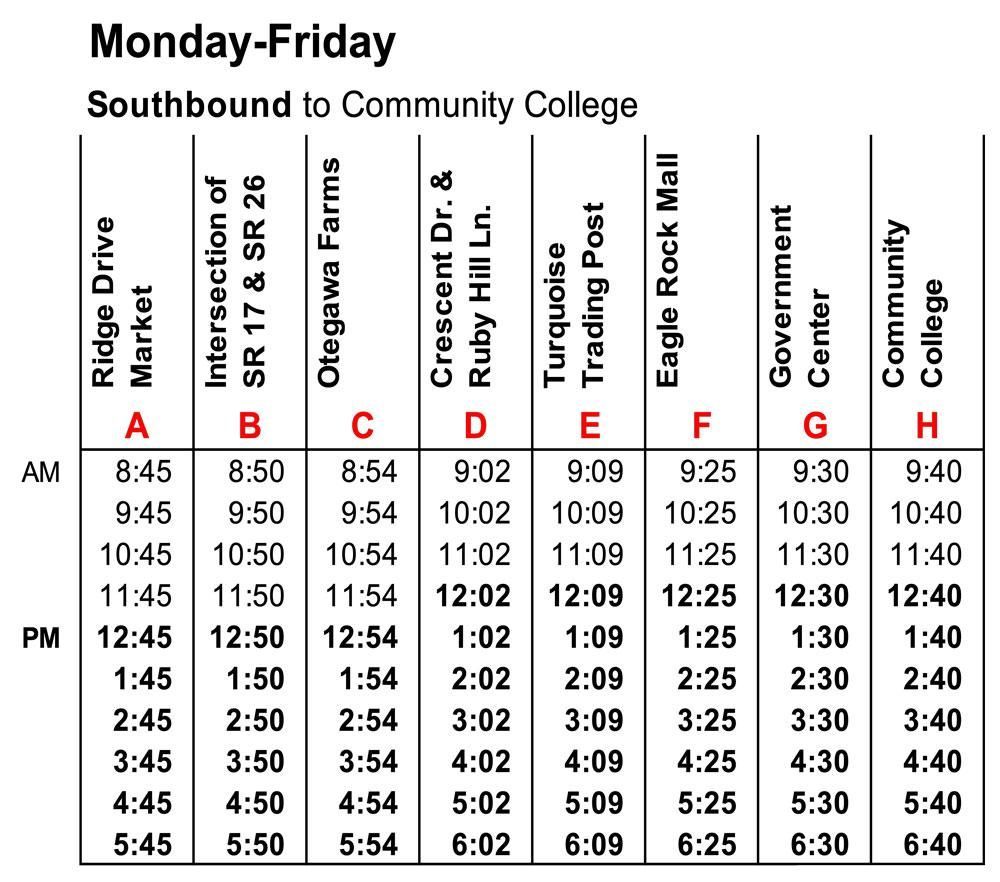
Schedules are generally laid out so that bus trips either read across, from left to right, or down, from top to bottom. Because we’re used to reading text from left to right, some users find it easier to understand a schedule where the trip times read across, left to right. But for schedules with a lot of timepoints and few trips, a schedule that reads down, from top to bottom, may take up less space.
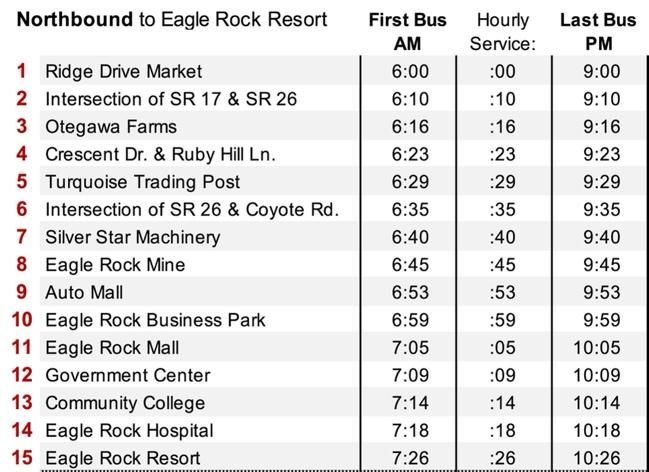
If your system operates on a regular hourly or semi-hourly schedule, then you may be able to use a smaller schedule that doesn’t show all of the times, but rather shows the start and end times, and the minutes past the hour service arrives each stop.
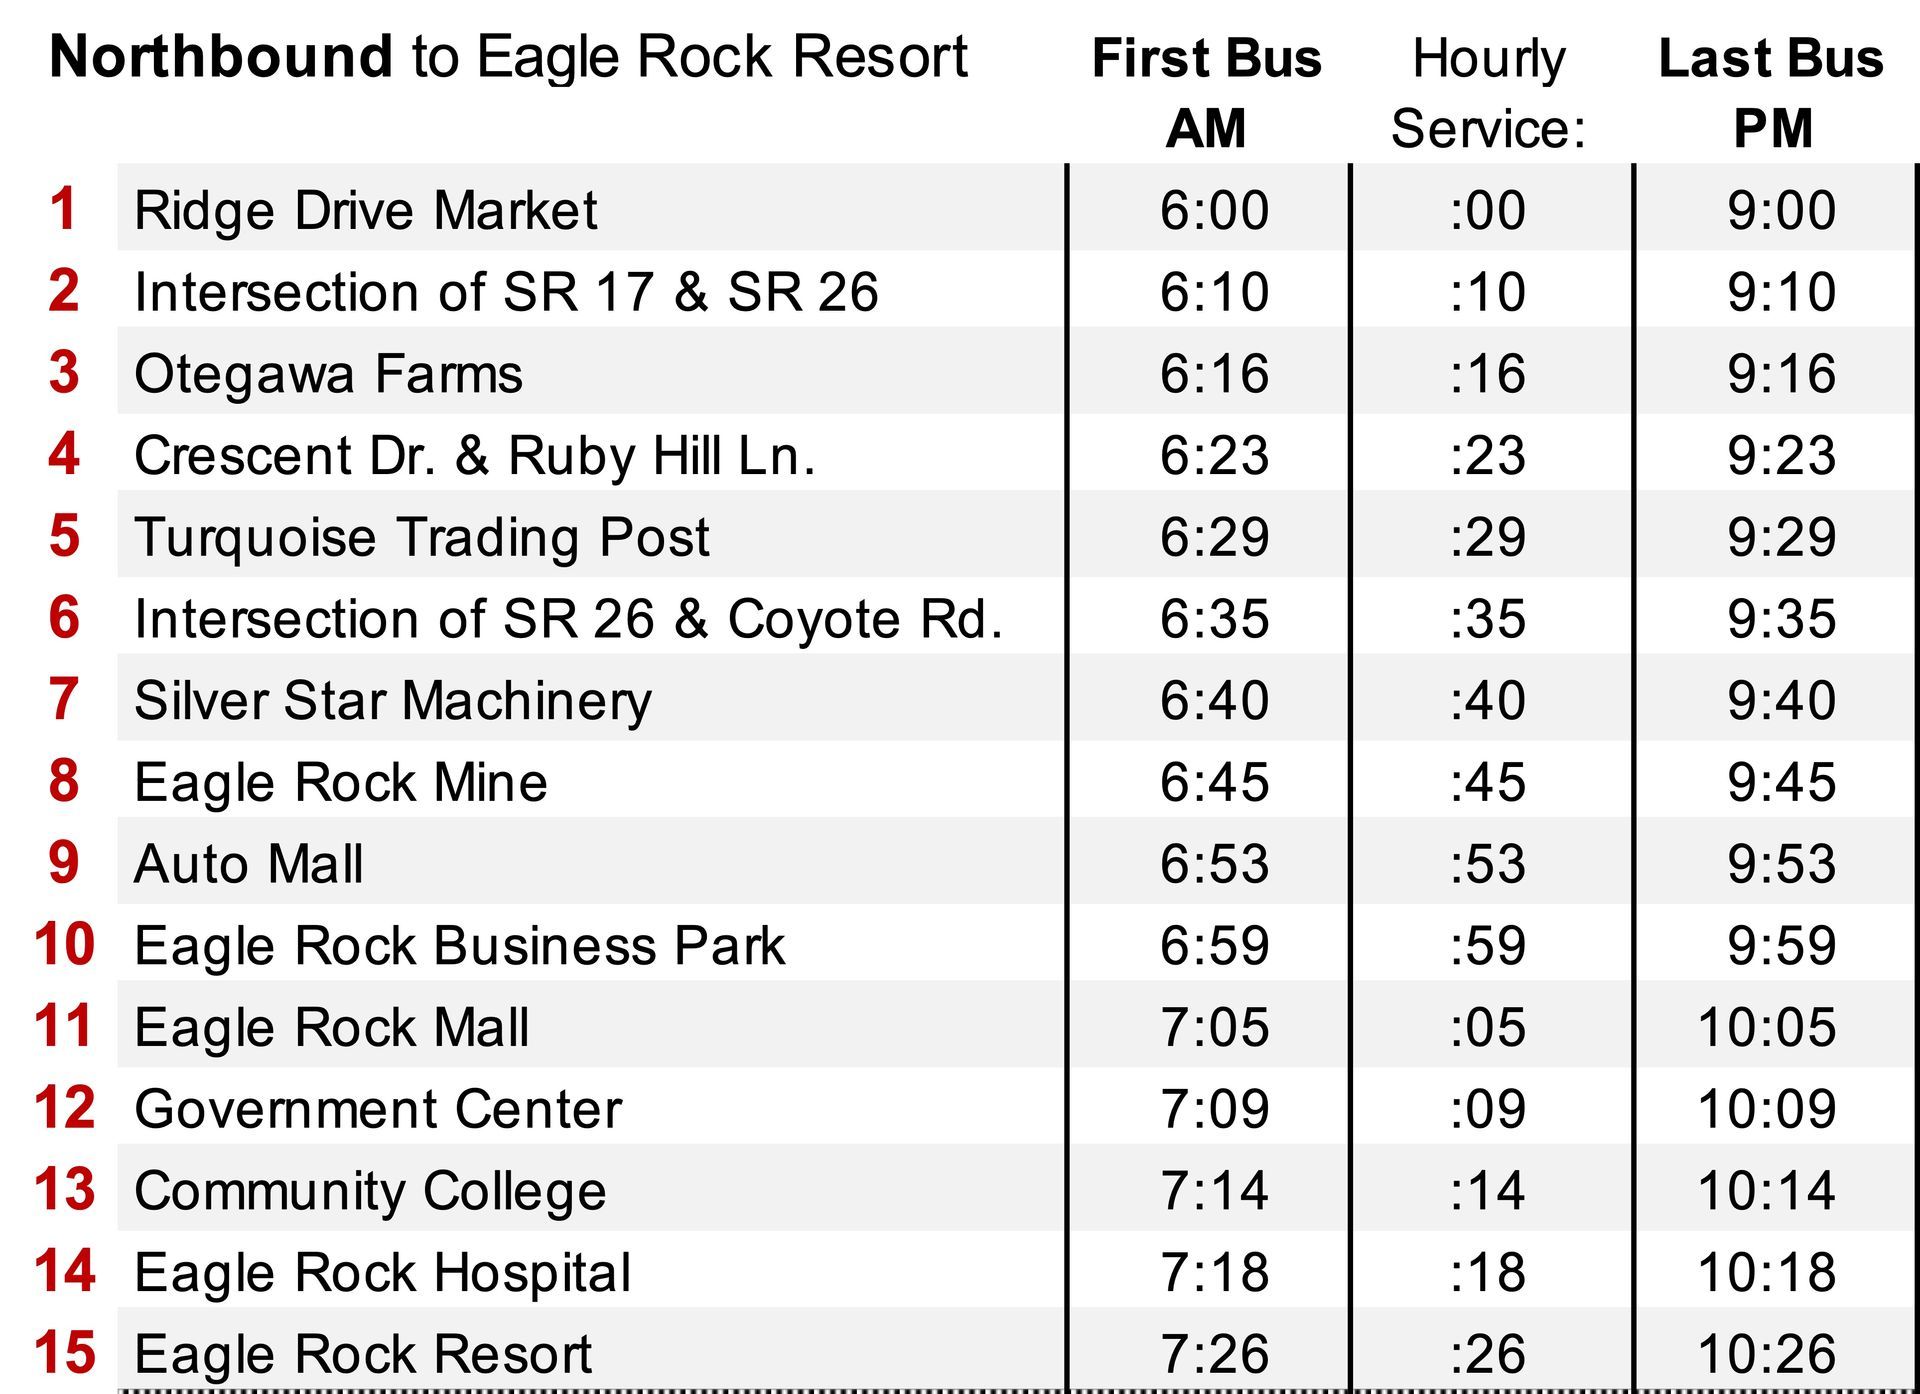
Hourly or semi-hourly service can be depicted using a simplified schedule like this.

Tips for Good Schedule Design
- If you have few bus stops, you might show times for every stop, but …
- ... if bus stops are close together (for instance, a minute or two between stops), you may want to only show times for certain stops (we usually refer to these as ‘timepoints’), and let the user know that their bus stop may be between timepoints.
- Avoid using transit terminology in your bus stop names, such as NS, FS for near-side, far-side, which you might use in internal documents but would be confusing to a rider.
- Try to keep type size large enough to easily read. Print it out and have some users try it to see how readable it is.
- Make your times look like times by using standard time format (8:24) instead of numbers that might be in your internal timetables (824).
- Avoid using 24-hour (or “military”) times (14:35) in your schedules, and instead convert to standard AM/PM times (2:35).
- Try to indicate AM and PM on the side or top of the schedule (and perhaps use a bolder font for one set of times to set them apart) instead of using AM and PM with every time. This makes the times easier to read.
National RTAP Schedule Templates
National RTAP has created templates in Excel to help you make attractive, easy-to-read schedules. Download the Schedule Builder Excel file here.
Each template can be customized to your system simply by changing the headings, the bus stop locations and the times. If you need more or fewer rows or columns, simply add or delete as needed. You can also change the background or text colors.
Explore each of the templates and decide which one will work best with your route system.
Templates 1 and 2 present the timepoint locations across the top, with each trip also reading from left to right. This orientation may be most intuitive to users accustomed to reading left to right. There are many ways to customize these timetables to fit your route, whether it's a "loop" route returning to the starting point, or a traditional two-way route. Template 1 has the location names turned sideways to make the overall schedule narrower and taller, and Template 2 has the location names oriented normally, which makes it wider and shorter.
Template 3 uses the opposite orientation, with the timepoint locations down the side, and each trip running from top to bottom. Both timetables can be used for a traditional two-way route, and the top one can be used alone for a "loop" route.
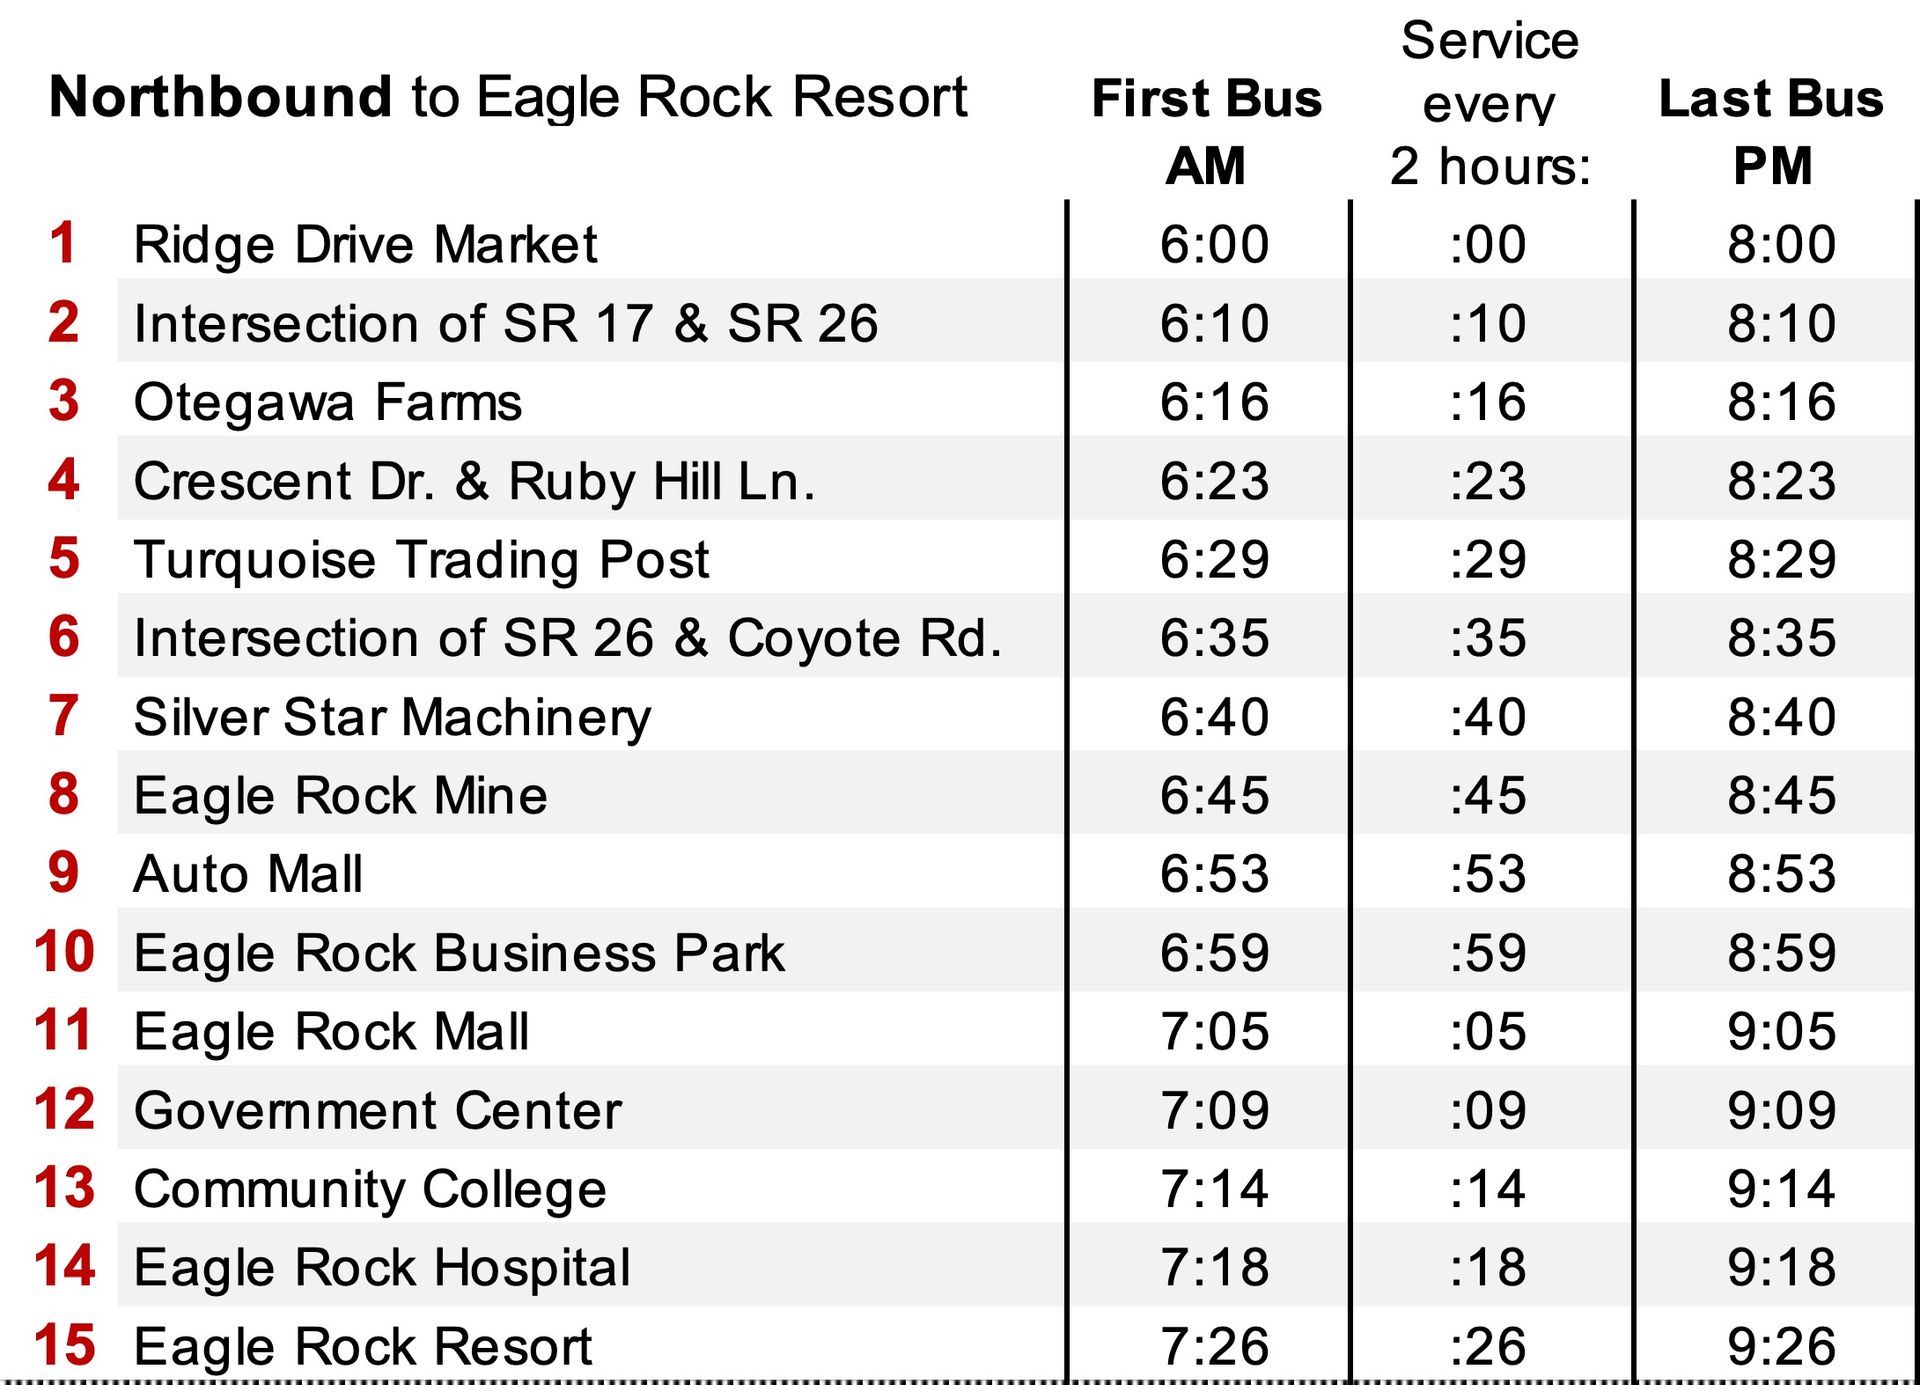
Templates 4, 5 and 6 are simplified timetables that may be used when your service is consistent on a one-hour, half-hour, or two-hour headway. Because of the consistent schedule, you can get away with not showing every single trip.
To Export your Schedule as a Graphic
These instructions guide you in exporting your schedule from Excel to use it in Canva or another design platform. These instructions are also in the Timetable Builder Excel file, and in the video below.
Note: if you've turned on gridlines in Excel, be sure to turn them back off - Excel > Preferences > View -- uncheck "Gridlines."
- Select the full area of the schedule that you want to place in Canva and copy. Select only those cells that you want included in your schedule graphic.
- Click on an empty area anywhere on the Excel sheet and right-click > Paste Special > Paste Picture
- You will now see a graphic copy of the timetable. In order to make it high-resolution, zoom out of the view in Excel (or select View > Zoom > 25%).
- Now click on the graphic of your timetable, grab the lower-right corner of it and drag out to scale the timetable graphic as large as you can, even if part of it goes off your screen. Exact size doesn't matter.
- Right-click on the graphic and select "Save as Picture." Save the image to your computer as a PNG or JPG. (PNG will retain transparent parts of the timetable; JPG will make any blank background areas white.)
- You can now delete the graphic from your Excel page, leaving your editable timetable in Excel. Be sure to save your Excel file for future edits.
- Now you can upload the timetable graphic into your Canva account's Uploads folder, or to another design platform.
Note that control-click is the Macintosh command for right-click.
Next page: Passenger Guide Brochures
Updated June 20, 2024

A program of the Federal Transit Administration administered by the Neponset Valley TMA
National RTAP is committed to making this website accessible to persons with disabilities. If you need assistance accessing any content on our website or need alternative formats for our materials, please contact us at info@nationalrtap.org or 781-404-5020.